Anais ,
arn|ah|ee|ce
Adaptive
Saber
Parts Configured Build.
This is one of those times when the desire to own a Dissident and with still remaining not completely convinced with wrapped Hilts, walked the path via ASPs door to configure it differently.
This happened.
Some Specs and Measurements:
Quad Cree 12Watt+ Red Orange| Pro Assembly| Champion Kit|
Sabercore2.0 Crimson Font| Black Momentary, Amber lit Switch| Charge Port.
Black Dissident Emitter| Weathered Mauler Switch| Weathered Exile Body| Black Pommel02
Hilt Length: 310mm
Blade Socket Depth: 46mm
Emitter Diameter: 38.07mm
Switch/Body Diameter: 34.91mm
Pommel Diameter: 40.54mm
Weight: 472 grams
Professional Assembly:
This was a preliminary release (and remains current) that incorporated the charge port inclusion shortly prior to the Champion V2 PnP Kit Release that soon followed. I debated between Warrior/Champion and whilst in a silenced room: blade colour, brightness and Hilt aesthetics are the elements that are measured but personally, nothing is more chill-invoking than the ignition sound. With Champion setup I can always mute the volume from the onboard Menu
(or like another when the Speaker and its associated wires decide to do the opposite of working) or simply muffle the Pommel vent during ignition to achieve the same. If I went straight to Warrior, the former becomes a little more difficult to re-enact when wanting sound to blast through the vents.
I procrastinated longer than I usually would prior to completing this purchase. Enquiries with SFCS returned that screen-grabs from the Builder Site to assist with alignment preference would not be accommodated. Stating the very same by Order Notes (without the visual aids) would also, not be accommodated. The only
instructions I could convey that would receive any recognition (
but not conveniently guaranteed) was the default versus flipped positioning of the selected Parts. So if deciding to proceed, it became a punt towards caution without any certainty to what product and how it is aligned would be delivered.
I firmly believe that the titled reference of
Professional Assembly (PA) seems more like
Assembled by Random Saberforge Technician (at his/her discretion at time of execution).
This influenced-after
Kota Hilt may well have been assembled by
Kota Circa TFU2 and notso much
Kota TFU1. Without obvious eyesight, relying solely on Force Vision apparently has its limitations.

With accepting the punt moving forward I figured, worse-case, the commonly present shroud tightened by shared blade retention screw over the> Emitter-well could be loosened and corrected at 180 degrees (much like Rebel Emitter, Reliant to name two).
Boy was I wrong. Expecting the shroud to be completely independent to the emitter-well proved to not be the case. The entire Emitter looks to be a once piece cast and machine finished. Perhaps the stock Dissident Emitter from Main Site may be machined differently and exemplifies the two-piece assembly, but I guess I’ll never know.
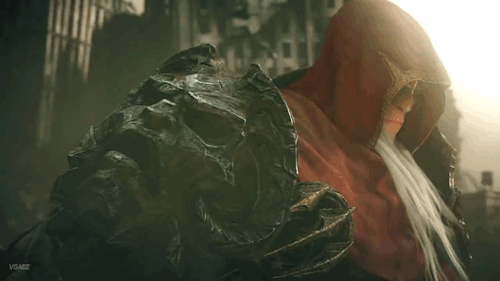
Whilst Parts are mostly centred and straight against the vertical axis, it still serves little comfort or satisfaction as a completed result. With reference to image above, either I have ill-perception of orientation or simply place too much confidence to what would be deemed as logical placement. Likely I have
FA of any idea with presuming expectations would be met. He discussion was exchanged once in a separate Thread, through identification and ensuring switches would be lined according to the facing Emitter. Well it looks to be yet another time where I had hoped to be proven wrong but wasn’t.
The Emitter features an angle-cut shroud that envelopes the emitter-well (blade socket). I would expect that the longer edge of the taper, drawing backwards to expose the blade socket marks itself as the obvious topside. Being a greeblie-Nut I went for the more conspicuous Mauler Switch for the very inclusion of the surface dials. With reference to the following image of a stock Dissident (granted that pictured is a Hero Setup with two AVs), the AVs (switch holes) are consistent to the appropriated topside of the Emitter snout.
That didn’t happen with my
Professional Assembly.
What further adds to the confusion is the fixed positioning of the Covertech. This typically marks the Hilt-surfaces underside, again consistently demonstrated with the stock Dissident image. So… essentially what I have is
Confusion Delusion or in spirit of Halloween, a potato disguised as a Pumpkin.
The delivered result. This is the: Topside; Bottomside; A-side. Take a pick.
The brilliance of Red Orange. This much remains consistent to illumination and brightness having Reviewed this colour before. Here though, as I didn’t just get a single LED Module in Red Orange but the Hilt that contains it as well, it measures just a small part of success from an otherwise challenged, assembled Hilt.
Further aspects of unwillingness to accommodate was being advised that the Champion Setup resulting from Pro Assembly would also include the Vibration Motor that has become standard on the V2 PnP Kits.
*gasp* It doesn’t.
Wanting the LED Module to have Quick Connect wiring also..
*gasp* No.
So… I build strategically chosen Parts from saberparts.com, Order said Parts from shopsaberparts.com and it becomes
Ready
To
Ship in +/- 2 Weeks. It is factory assembled and the options surrounding are minimal to non-existent. Versus Ordering a Pre-configure/Built from Etsy and having to accept the leather wrap as-is and it becomes RTS in 3-5 Days, versus Ordering Main Site, becoming RTS 8+ to 12+ (-) Weeks in stock form.
Or just stay with shopsaberparts and go PnP without the PA, and (like a puzzle) fine-tune/tweak the alignment with/without Timing Shims just for the sake of the charge port’s inclusion. *sigh*
Ordinarily, I’d just park this Title-reference into a FFS Series Order but the deflation has just prompted a
?.